![[GBA教程]使用tiled搭配porytiles快捷处理地图块-宝可梦营地](https://pokedream.cn/wp-content/uploads/2026/01/background-scaled.jpg)

前言
本教程仅适用于WSL反编译游戏,binary改版请自行摸索
为了解决切割地图块过于繁琐的问题,这里介绍一套使用Tiled拼地图块并用porytile处理进反编译项目的方式,跳过了切割重复素材和拼地图块的过程。
准备
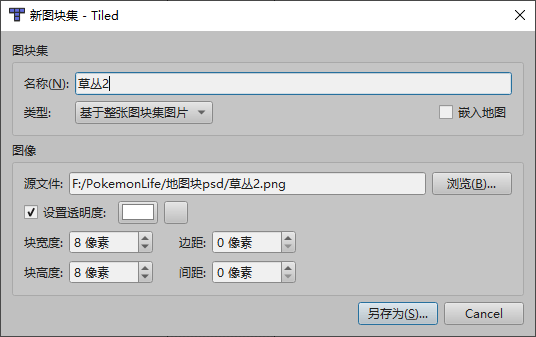
1.处理好的地图块素材,每个素材代表一个色板,必须是索引模式的16色素材
2.Tiled
3.porytile,(由于老外的项目比较司马,没有发布编译好的软件,这里提供一个我编译后的版本)
https://pan.baidu.com/s/1xpoR5-rSkdV1tah484Gb4A 提取码: j2kq
4.porymap
用Tiled拼地图块
打开Tiled,选择新建地图,块大小设置8×8,地图大小宽度必须为16,高度不得超过128
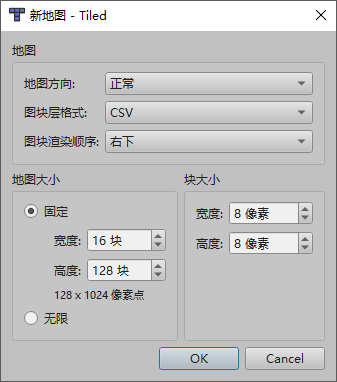
新建完毕后右下角切换到图块集,把处理好的地图块素材拖到窗口,生成一个新的tsx文件
为了能更好的浏览地图块的效果,可以勾选设置透明度,把颜色设置为素材图片的背景色,这样在窗口里显示的地图块不会有背景颜色
注意:请勾选嵌入地图
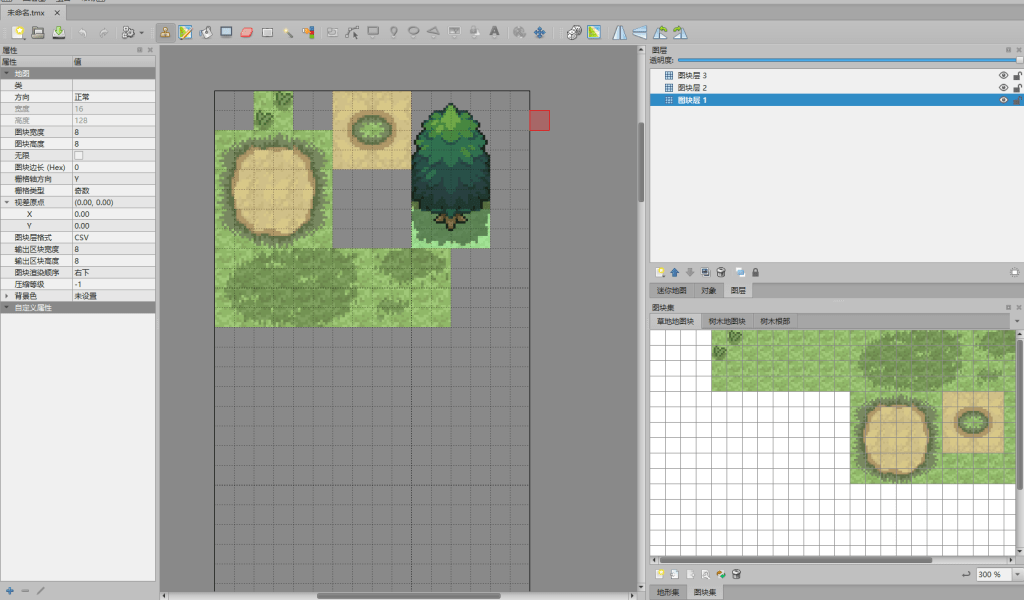
右键图层窗口,新建两个图块层,保证有且仅有三个图层,这三个图层上的地图块会被设置到porymap里的上中下层,接下来将地图块素材组合拼到左边的地图上,最后保存成tiled.tmx
处理tmx文件
把拼好的tiled.tmx文件放到需要修改的地图块文件内,比如要修改原版T0的general地图块,则把tmx放到data/tilesets/primary/general文件夹,并把porytiles放到项目的根目录下
保存下面的python脚本和porytiles放到同一处
#!/usr/bin/env python3
"""
Tiled地图分层导出工具
"""

import os
import sys
import pytmx
from PIL import Image
from pathlib import Path
import subprocess

if len(sys.argv) < 3:
    print("使用方法:python <py文件> <地图块名字> <T0或者T1>")
    sys.exit(1)

runOnWindow = False
tileset_type = sys.argv[2]
if tileset_type == "0":
    project_path = f"data/tilesets/primary/{sys.argv[1]}/"
else:
    primary_path = f"data/tilesets/primary/{sys.argv[3]}/"
    project_path = f"data/tilesets/secondary/{sys.argv[1]}/"
tmx = pytmx.TiledMap(project_path + "tiled.tmx")
output_path = project_path + "porytile"
color = (255, 0, 255)

# Window路径转为Ubuntu
def windows_to_ubuntu_path(win_path):
    if runOnWindow == True:
        return win_path

    path = win_path.replace('\\', '/')

    # 处理盘符
    if ':' in path:
        drive, rest = path.split(':', 1)
        drive_letter = drive.lower().strip()
        return f'/mnt/{drive_letter}{rest}'

    return path

# 获取指定id图块的原图片路径
def GetTilesetSource(index):
    # 只有一张图块
    if len(tmx.tilesets) == 1:
        return tmx.tilesets[0].source, 0

    for i, tileset in enumerate(tmx.tilesets):
        if index < tmx.tilesets[i + 1].firstgid:
            return tileset.source, i

    return None, 0

def copy_8x8_block(src_image, src_x, src_y, dest_image, dest_x, dest_y):
    """
    从源图像复制8x8像素块到目标图像

    参数:
        src_image: 源图像 (Image对象)
        src_x, src_y: 源图像中的起始坐标
        dest_image: 目标图像 (Image对象)
        dest_x, dest_y: 目标图像中的起始坐标
    """
    # 1. 从源图像裁剪8x8区域
    block = src_image.crop((src_x, src_y, src_x + 8, src_y + 8))

    # 2. 粘贴到目标图像
    dest_image.paste(block, (dest_x, dest_y))

    return dest_image

def tile_index_to_coordinates(tile_index, image_width, tile_size=8):
    """
    将格子编号转换为起始像素坐标

    参数:
        tile_index: 格子编号(从0开始)
        image_width: 图像总宽度(像素)
        tile_size: 每个格子的大小,默认为8

    返回:
        (x, y) 起始坐标
    """
    # 每行有多少个格子
    tiles_per_row = image_width // tile_size

    # 计算行和列
    tile_x = tile_index % tiles_per_row  # 列
    tile_y = tile_index // tiles_per_row  # 行

    # 转换为像素坐标
    pixel_x = tile_x * tile_size
    pixel_y = tile_y * tile_size

    return pixel_x, pixel_y

# 地图块图片数据路径
png_data = {}
png_width = tmx.width * tmx.tilewidth
png_height = tmx.height * tmx.tileheight
png_file_name = ["bottom.png", "middle.png", "top.png"]

# t1地图块要先加载T0的地图块素材
if tileset_type == "1":
    primary_tmx = primary_path + "tiled.tmx"
    p_tmx = pytmx.TiledMap(primary_tmx)
    for p_tiles in p_tmx.tilesets:
        tile_img = Image.open(windows_to_ubuntu_path(p_tiles.source))
        print(p_tiles.source)
        if tile_img.mode == "P":
            # 图片的背景色处理成默认颜色
            palette_datas = tile_img.getpalette()
            palette_datas[0] = 255
            palette_datas[1] = 0
            palette_datas[2] = 255
            tile_img.putpalette(palette_datas)
        png_data[p_tiles.source] = {"img": tile_img, "flag" : False}

if os.path.exists(output_path) == False:
    os.mkdir(output_path)

if os.path.exists(output_path + "/palette-overrides") == False:
    os.mkdir(output_path + "/palette-overrides")

for index, layout in enumerate(tmx.layers):
    outputPng = os.path.join(output_path, png_file_name[index])
    img = Image.new('RGB', (png_width, png_height), color)
    img.paste(color, [0, 0, png_width, png_height])

    for yPos, data in enumerate(layout.data):
        for xPos, bytes in enumerate(data):
            if bytes > 0:
                path, offset, flag = tmx.get_tile_image_by_gid(bytes)
                path = path.replace(project_path, "")
                if path not in png_data:
                    tile_img = Image.open(windows_to_ubuntu_path(path))
                    if tile_img.mode == "P":
                        # 图片的背景色处理成默认颜色
                        palette_datas = tile_img.getpalette()
                        palette_datas[0] = 255
                        palette_datas[1] = 0
                        palette_datas[2] = 255
                        tile_img.putpalette(palette_datas)
                    png_data[path] = {"img": tile_img, "flag" : True}
                copy_8x8_block(png_data[path]["img"], offset[0], offset[1], img, xPos * 8, yPos * 8)

    img.save(outputPng)

fileindex = 0
for palslot, pngpath in enumerate(png_data):
    if png_data[pngpath]["img"].mode == "P" and png_data[pngpath]["flag"] == True:
        paldata = png_data[pngpath]["img"].getpalette()
        if tileset_type == "0":
            palpath = os.path.join(output_path, "palette-overrides", str(fileindex).zfill(2) + ".pal")
        else:
            palpath = os.path.join(output_path, "palette-overrides", str(fileindex + 6).zfill(2) + ".pal")
        fileindex += 1
        with open(palpath, "w", encoding="utf-8") as pl_f:
            pl_f.write("JASC-PAL\n0100\n16\n-\n")
            for i in range(3, len(paldata), 3):
                r = paldata[i]
                g = paldata[i + 1]
                b = paldata[i + 2]
                pl_f.write(f"{r} {g} {b}\n")
            if len(paldata) // 3 < 16:
                for i in range(16 - len(paldata) // 3):
                    pl_f.write(f"-\n")

if tileset_type == "0":
    cmd_text = ["./porytiles", "compile-primary", "-o", project_path, output_path, "include/constants/metatile_behaviors.h"]
else:
    cmd_text = ["./porytiles", "compile-secondary", "-o", project_path, output_path, primary_path + "porytile", "include/constants/metatile_behaviors.h"]

print(" ".join(cmd_text))

subprocess.run(cmd_text)
打开wsl,运行
python3 make.py general 0
make.py是你保存的python文件,general是地图块目录名字,0表示这是T0地图块(primary)
如果你修改的是T1地图块,则改为
python3 make.py general 1 <T0地图块>
除了把0改为1外还需要添加一个t0地图块作为参考,T1地图块内如果有T0使用的地图块,则会直接使用T0的图块而不额外生成
最终效果
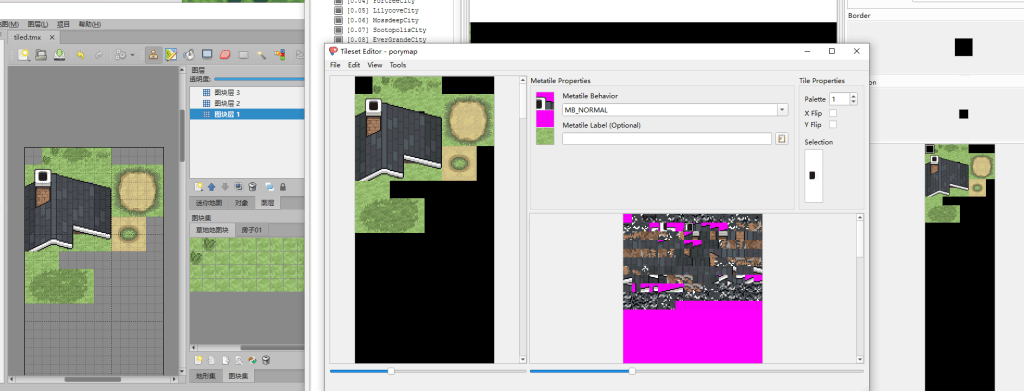
更多porytiles的教程请查看Home · grunt-lucas/porytiles Wiki
![[GBA]ER2.65V2 简略汉化版 + 全特性介绍文本-宝可梦营地](https://pokedream.cn/wp-content/uploads/2026/03/main-0.png)
![[NDS中文]宝可梦白2加强v1.0.1测试版-宝可梦营地](https://pokedream.cn/wp-content/uploads/2025/12/pokew2.png)

![[NDS]心金魂银自用debug内置修改器-宝可梦营地](https://pokedream.cn/wp-content/uploads/2026/01/game_patched__13041.png)
![[GBA教程]pokeemerald实现动态地图色板功能-宝可梦营地](https://pokedream.cn/wp-content/uploads/2025/12/LittlerootTown.png)
![[记录]GBA反编译上踩过的一些坑-宝可梦营地](https://pokedream.cn/wp-content/uploads/2025/12/water.jpg)

暂无评论内容